Welcome to Step 2 of Mom Does Reviews “How to Start a Blog” series ~Getting Started with WordPress. This post will show you how to install WordPress on your new site and the top three areas of your WordPress Dashboard.
It is important to know that each website is different and requires different systems to operate them properly. iPage has a Drag and Drop Site Builder that makes setting up business pages easy, but for the purpose of setting up a blog, you will need to visit their Mojo Marketplace to install WordPress after you receive your control panel login. The video below explains how to install WordPress on your iPage domain.

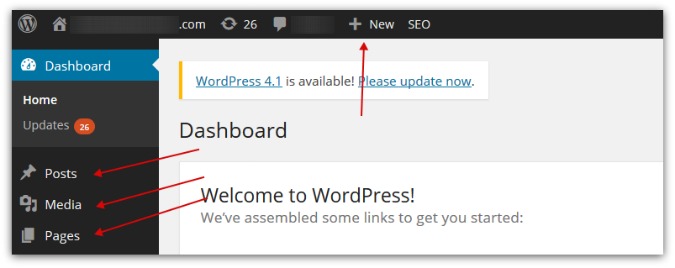
Once you have installed WordPress on your site, login. If you’re not sure where to go, type your website url and /wp-admin into your browser’s address bar. It will look something like this momdoesreviews.com/wp-admin. From there you will log into your Dashboard with your username and password.
Learning how to use WordPress is easy. Once you are in your new WordPress Dasboard, click through all of the buttons on the left side of your screen to get a feel for what they are. Posts, media, and pages are where you will go the majority of the time when you are working in your blog. You can access these areas from the toolbar on the left in your Dashboard, or from ANY page using the Admin Toolbar drop down at the top of each page when you are logged in. Here’s a Hosting Foundry’s review that will give you even more tips about web hosting.
Learning the Top Three – Post, Page, and Media
Post, page, and media are the main three areas of your WordPress Dashboard that you will access throughout the life of your blog. The rest of the buttons you see on your left are only accessed periodically (when you need them).
A Post is visible to your audience and can be organized by category and tags. They appear in reverse chronological order on your home page, showing your readers your most recent entries first. What you are reading now is called a “post”.
A Page is often hidden from your readers unless you provide them with a way to reach it or they stumble upon it in search engine results. They are not categorized and will not appear on your home page automatically like a post does. We use pages for several different reasons. Your About page should be the first page you create for your blog. This will tell your readers about you. If you look at our menu above, we have paths to pages in several different places. If you click “About Us” you will be taken to Pam’s introduction page about her. Selecting the “Start a Blog” tab will take you to a page listing of all of our “Start a Blog” posts and additional resources.
Media is where you can upload images to be used anywhere on your blog. Pictures for a post, pictures for a page, header images, sidebar images, PDF files – media is where all of this information is stored. Once you have an image file in “media” you can access it again anytime you need it someplace else on your blog without needing to upload it again.
Coming up Next on How to Start a Blog
Blog Appearance and Themes